Studio One S1 Mixdown Question

MikeS

Student Of The Blues
Staff member
I've got a song with three tracks.
If I all but one track & "Export Mix Down" each one individually, they export just fine, but If I have them all included in the mixdown I'm clipping at 5.9 over!
My question is should I try to fix this for each track or just lower the Master by 5.9? Will it make any difference?
As I said no single track seems to be a problem, just when they are combined.
 

CaptainMoto

Blues Voyager
I believe you have a gain staging issue, there maybe a few other threads already addressing that, take a look at previous discussions, here's one :
http://bluesguitarunleashed.com/forum/index.php?threads/studio-one-5-levels.31644/

There are a number of ways to address that.
You can adjust the fader on each track, even though it may not show clipping, the cumulative volume form all tracks builds up.
If you have multiple tracks and have spent considerable time adjusting the balance between them, you may want to take a global approach rather than track by track.
Your optimum target is -18db (on the fader) for each channel and somewhere around -6db on the final Main Mix bus.

Prior to dropping your mix faders go to your input level and make corrections there.
That can be done by viewing the inputs and adjusting the trim gain at the top of the channel or......
here's a simple way to fix gain staging across all channels at once.
That approach will preserve the fade balance you've worked on by dropping the gain on all channels.

A similar result can be accomplished by using the "Mix Tool" from your effects browser or, clicking on the audio event in the track and lowering the clip gain.

Alternately, you could try putting a Limiter on the main mix channel.
 
Last edited:

CaptainMoto

Blues Voyager
To answer the simple question "fix each track or fix the master ?" either one will work.
End result is the same but, my personal preference would be to fix the tracks which will leave you with more volume flexibility on the final master. This approach also preserves the balance you set up between the tracks while adjusting the overall volume at on the final mix.
 
Last edited:

PapaRaptor

Father Vyvian O'Blivion
Staff member
I agree with @CaptainMoto that the preferred method is to fix the individual channels.
However, that may (or may not) be what you're thinking. It isn't just a matter of turning down all channels equally. With that method there really is no difference between individually adjusting and knocking down the final mix.

In addition to the Captain's advice, with Studio One Pro v5 you have the Gain Envelope (clip gain) function that lets you change the levels on a portion of a track.
When you attempt a mixdown and get the clip notice, make a note of the point in the recording where you first get the notification. Then go in and listen to the entire track at that point. Equally important, keep an eye on the graphic display of the individual tracks. It could be something as simple as an overly aggressive cymbal crash or kick drum. Using the gain envelope on only the portion that clips in the final mix will allow you to briefly turn down the gain on the offending portion, without the need to lower everything on the entire song.

There is something else, I will mention. Griff mentioned in a couple AAP sessions that he normalizes a backing track before doing recordings. This tends to bring up the backing track to almost the clipping point and really doesn't leave much headroom for additional instruments. If you're going to normalize, I suggest you normalize and then drop down the end result -12db. This gives you room to add in your own guitar and vocals. I've seen this suggestion several times in Presonus videos. In fact, Presonus believes it is important enough they have included a macro to normalize to -12db in Studio One Pro (it may also be in S1 Artist). You can find it here:
Normalize-12.jpg
The top circled item turns on/off the macro toolbar and the macro toolbar (bottom circled) already has the normalize -12 on the bar.

I also use a compressor on pretty much all my guitar recordings for the VJR. My picked guitar levels can vary a lot, dynamically, much more than is needed (or wanted) for a solo. Judicious use of the compressor on a clean guitar can make the instrument sound much louder in the mix without increasing the overall mix. Surprisingly, it takes quite a bit of compression before you will actually hear the compression when you're playing over a backing track. I can get away with compression of up to about 4:1 (using the single band compressor in S1) with no noticeable pumping. If you're doing an acoustic guitar rhythm or solo without a backing track, you will find that to be too much compression.

Like anything else, the product you are looking to create will dictate the amount of TLC you put into it. For something you want to use as a showpiece, it's worth the extra time to polish the mix as finely as you can. For a VJR track or simple demo, I would just stick the limiter into the Inserts for the Main Mix and call it a day. The default setting for the Limiter in Studio One sets the limiter to -.1db, if I recall correctly. That will keep you out of trouble and 90% of your listeners will never know the difference.
 

MikeS

Student Of The Blues
Staff member
Thanks guys. I may go back to the "raw" files and re mix it to see if I REALLY understand what you are saying.
 

MikeS

Student Of The Blues
Staff member
Ok, I Kinda get it, but I'm still having a problem figuring out where and which track.
If I work with any individual track (muting the others), there is no clipping, but once combined, they clip.
I'm getting closer but it's a major trial and error exercise.
- mute 2 of the three tracks
-set markers
-export mixdown between markers

I've found a few hot spots that way, but now that I've eliminated those hot spots, the combined tracks still clip. a bit less than they did, but still...
I'm also noticing as it's exporting that the clipping changes in several places.
Is there a way to tell as it exports, exactly WHERE the clipping occurs? It seems to export so fast that it's hard to tell

For instance, on export, it's telling me that there is clipping somewhere around here:
2021-02-24_Clipping.png
 
Last edited:

CaptainMoto

Blues Voyager
Ok, I Kinda get it, but I'm still having a problem figuring out where and which track.
If I work with any individual track (muting the others), there is no clipping, but once combined, they clip.
I'm getting closer but it's a major trial and error exercise.
- mute 2 of the three tracks
-set markers
-export mixdown between markers

I've found a few hot spots that way, but now that I've eliminated those hot spots, the combined tracks still clip. a bit less than they did, but still...
I'm also noticing as it's exporting that the clipping changes in several places.
Is there a way to tell as it exports, exactly WHERE the clipping occurs? It seems to export so fast that it's hard to tell

For instance, on export, it's telling me that there is clipping somewhere around here:
View attachment 13793
Mike,
Have you tried getting all the tracks in the target zone of -18db?
I'm thinking if you do that it will be easy to adjust the main mix bus to a non clipping level before you export.
I think other DAWS display clipping better than S1, if somebody has the secret formula to do that, please share it.
 

CaptainMoto

Blues Voyager
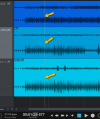
Those wave forms look interesting.
As stereo tracks, I'm wondering why you have such a wide variance between the L/R side within each track.
 

PapaRaptor

Father Vyvian O'Blivion
Staff member
I've found a few hot spots that way, but now that I've eliminated those hot spots, the combined tracks still clip. a bit less than they did, but still...
I'm also noticing as it's exporting that the clipping changes in several places.
Is there a way to tell as it exports, exactly WHERE the clipping occurs? It seems to export so fast that it's hard to tell

Mixing is not unlike taking fluids from three different glasses and adding them to a fourth. If all the small glasses are 6 ounces and full and you try to pour them into a 16 ounce glass, it ain't gonna work.

As far as telling exactly where the clipping occurs, I'm not aware of any logging tools in Studio One. I've always watched the export process and noted the time the clip indicator first shows up, go back to the song and fix that, export, go back, lather, rinse, repeat. You can also do a mixdown to the project page and view the resulting waveform, which will give you a good idea of where clipping is occuring.
 

MikeS

Student Of The Blues
Staff member
Those wave forms look interesting.
As stereo tracks, I'm wondering why you have such a wide variance between the L/R side within each track.

I was wondering that too. That's the way they were when I downloaded them.
 

MikeS

Student Of The Blues
Staff member
What I think I've figured out is that, for the most part, the drum part is included in each of my three tracks, so often when there is a snare hit , that's where it clips.
I select each snare hit that clips, one at a time, highlight it, then I use the split range function to single it out and drop the hit by a few db.
It's tedious and time consuming. Is there a better way?

Here's the end result:
Hotel Backing: https://dl.dropbox.com/s/7qzbejo1ddobhen/Hotel California-Backing.mp3?dl=0
 

CaptainMoto

Blues Voyager
Yes, that is a tedious approach.
You can do the same thing easier by activating the Clip Gain Envelope.
( I believe this is only available on the latest version of S1, V5)
Watch the video.
You could also try a compressor however, if you're not up to speed on using the compressor, you may not be happy with the results.

 
Last edited:

MikeS

Student Of The Blues
Staff member
I'm clearly not up to speed on compressors. I guess I mistakenly thought that a compressor would bring everything up to about the same level, so in my thinking, everything would clip.
I guess I really need to dig in on them.
Thanks!
 

CaptainMoto

Blues Voyager
I'm clearly not up to speed on compressors. I guess I mistakenly thought that a compressor would bring everything up to about the same level, so in my thinking, everything would clip.
I guess I really need to dig in on them.
Thanks!
Compressors, #1 function is to reduce volume peaks but it also brings up lower volume elements.
Net is......everything sounds louder without peaking.
There's a compressor discussion up in "Gear Talk"
Here's one of my comments there:

"I've also found it helpful to compare compression to taking a photograph.

Think about taking a picture of a family group (Dad, Mom, Kids, Baby & the Dog).

You need to step way back to fit them all in the picture which in turn makes it hard to see their faces.
You can "compress" the group by having mom and dad kneel or sit.

Now you can get closer and still fit them all into the frame.
This makes it possible to see more details on everyone's face, even for the little kids standing in front of big daddy."
 

PapaRaptor

Father Vyvian O'Blivion
Staff member
OK, here's what I did.

1. I took the right channel (drums and bass) and exported it separately. To do this, just set the Pan to far right and do an Export Mixdown. It creates a new stereo track with just the right channel information, which is perfectly synced with the original and is added to the timeline. Then convert it to Mono, so it appears in the middle of the sound field.

Note: After doing the mixdown, return the Pan control to center (Hint: put the pointer in the pan indicator on the channel strip. Hold the CTRL key and left-click. Returns to dead center every time).

2. In the original stereo track, use a Splitter in the Inserts set for left/right. This allows you to process the left and right separately. The left gets left alone. On the right leg, I put in a ProEQ plug-in with a Low Cut enabled at about 360Hz (tweaked by ear). This will take the punch out of the right channel, but leaves the drum and bass overtones alone. It also leaves the ambience that drifts in from the left channel alone. I did apply a little compression to it at about 6.0:1.

3. In the new Mono track, I put in some Compression at about 7.0:1 and left it panned dead center. This will put the punch that we took out of the right channel back in to both the left and right channels. A side benefit is it will give a little more sparkle to the cymbals and other transients that were locked far right.

Mixdown levels: Original signal -1.8db
Mixdown levels: New Mono signal +1.8db

This results in what you hear.
I did an A/B playback and to my ear, the modified recording actually sounds like a wider sound field and slightly cleaner. YMMV.
 

MikeS

Student Of The Blues
Staff member
OK, here's what I did.

1. I took the right channel (drums and bass) and exported it separately. To do this, just set the Pan to far right and do an Export Mixdown. It creates a new stereo track with just the right channel information, which is perfectly synced with the original and is added to the timeline. Then convert it to Mono, so it appears in the middle of the sound field.

Note: After doing the mixdown, return the Pan control to center (Hint: put the pointer in the pan indicator on the channel strip. Hold the CTRL key and left-click. Returns to dead center every time).

2. In the original stereo track, use a Splitter in the Inserts set for left/right. This allows you to process the left and right separately. The left gets left alone. On the right leg, I put in a ProEQ plug-in with a Low Cut enabled at about 360Hz (tweaked by ear). This will take the punch out of the right channel, but leaves the drum and bass overtones alone. It also leaves the ambience that drifts in from the left channel alone. I did apply a little compression to it at about 6.0:1.

3. In the new Mono track, I put in some Compression at about 7.0:1 and left it panned dead center. This will put the punch that we took out of the right channel back in to both the left and right channels. A side benefit is it will give a little more sparkle to the cymbals and other transients that were locked far right.

Mixdown levels: Original signal -1.8db
Mixdown levels: New Mono signal +1.8db

This results in what you hear.
I did an A/B playback and to my ear, the modified recording actually sounds like a wider sound field and slightly cleaner. YMMV.

Thanks. I couldn't figure out how to separate the L&R unequal recording. IS "Splitter" A Studio One tool? I'm not seeing it under Presonus.
 

CaptainMoto

Blues Voyager
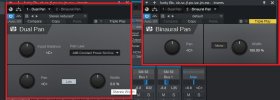
Would the Dual Pan have allowed me to adjust gain on the Left & Right separately?
Dual Pan gives you the ability to independently adjust the panning of L/R sides within a stereo track.
It does not adjust the gain independently.
 
Top