Studio One Studio One - Step By Step process for recording in the VJR

Rancid Rumpboogie

Blues Mangler
Papa, your video was EXCELLENT. I have been using Audacity and didn't even know what this is. 99% of it made absolute sense to me, and I am dumb as a box o' rocks. I plan to give it a try, and will probably be using it.
 

Mr.Scary

A Blues Legend in My Own Mind
While it is a great video,I will need to watch it several times. All of it is not sinking in right away. I'm working in getting my mic to pick up the signal right now. My voice is fine just playing with amp distance and the standard PC mic right now
 

PapaRaptor

Father Vyvian O'Blivion
Staff member
It's pretty easy to rattle it off, because I've done it more than a few times. I know how you feel about having to watch it again. When I set up my OBS video switching software to be able to produce the videos, I watched a configuration vid on Youtube. What the guy explained (and he couldn't have been more than 21) in about 10 minutes, I had to watch 4 or 5 times and stopped the video several times before I got a basic setup operational.

It does get easier, I promise.
 

Zzzen Dog

Blues Junior
So I've noticed two things... if the tempo in the template is lower than that of the track, it slows down the track (I think I've fixed that by changing my template to not stretch the tempo. However, as I continue along to your section on setting the metronome tempo, when I change the tempo, the cadence of the song changes. Doesn't happen in your example. What am I missing?
 

PapaRaptor

Father Vyvian O'Blivion
Staff member
The only thing that should affect the actual audio file in any way is Timestretch.
So I've noticed two things... if the tempo in the template is lower than that of the track, it slows down the track (I think I've fixed that by changing my template to not stretch the tempo. However, as I continue along to your section on setting the metronome tempo, when I change the tempo, the cadence of the song changes. Doesn't happen in your example. What am I missing?
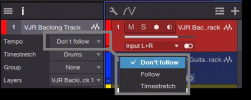
I'm not really sure. If you open the track inspector for a track, (lower case i towards the upper left corner, this is the only thing that usually affects the tempo of a WAV file event.
Inspector-Time.png
If you click on what is in the Tempo window, you'll get the three options you see in the graphic.
Don't Follow - Treats the track completely independent of the Song tempo.
Follow - Start positions of an Event (or events) are tied to the timeline grid, but they are not stretched.
Timestretch - Start positions follow the song temp, like in follow mode, but Events are stretched to fit the song tempo.

If you import a song with tempo information stored in its header, it may behave oddly, but a regular track from the VJR (and the one I used for the video) does not have the information stored.

Is it possible that you bounced the track and then made tempo changes? Once a track is bounced, the tempo information is printed to the copy of the file that S1 uses (it is stored in a file pool). Once it is bounced, if it is timestretched and the tempo is changed, it will react. As an example, if you use the track from the VJR that I used in the video, it's at 120 BPM, but there is no tempo information stored on the copy I used. I can import it and change the tempo all over the place, but the actual track won't change. If I bounce it (while the tempo is set to 120) and then change the tempo of the track, it will play back at whatever tempo I set, if Timestretch is set.

I mentioned in another thread (Studio One Tempo Changed) that there is an option to read or ignore tempo information when you import a file and another one when you export a mixdown. For use in the forum, I recommend that those options remain unchecked, just to avoid possible issues with songs playing at the wrong speed.

I don't know if that sheds any light on what you are experiencing.
 

SuzanneShafer

Addicted to Bikes & Blues
Thank you, Papa. This instructional video was timely. I'm new to guitars, new to Blues, and now it looks like I'm about to be new to Studio One as well (it's downloading this very moment), because I really want to be able to participate in the VJR someday and apparently pentatonic scales are not the only things I need to be fluent with before I can do so. Good thing I'm a software junkie.
 

PapaRaptor

Father Vyvian O'Blivion
Staff member
@PapaRaptor you may want to sticky this. I had downloaded S1 a few weeks ago with the intention of going through this tutorial. I had to scroll quite away down to find this. It is the sort of thing that needs to be available,

cheers

Al.
Hey Al,
There is a directory of the Studio One threads that is already posted as a sticky. If all the Studio One threads were sticky, it would take up the entire first page of threads.
https://bluesguitarunleashed.com/forum/index.php?threads/studio-one-reference-list.30875/
 

ChrisGSP

Blues Journeyman
Great video @PapaRaptor. I've got a question - at 5:05, when you grab the first click and "move it over to the start of the second bar" - I can't find any way to do that in my Studio 1 Prime. I just can't see in the video exactly what you are doing with the mouse pointer. I just keep on highlighting part of the song, instead of moving that spot around. Something simple that a Learner Driver has missed?
 

PapaRaptor

Father Vyvian O'Blivion
Staff member
Something simple that a Learner Driver has missed?
The pointer can do different things, depending on where it is located within an event.

If you put the pointer in the lower half of the event, it remains a pointer. Click, hold and drag will allow you to move an event backwards and forward in the timeline. This is what I was doing in the video.

What you're telling me you're doing is done with the pointer in the top half of the event, which is the range tool. If you click and drag, it will highlight a portion of the event. The most noticeable difference is when you're in the top portion of the event, the pointer changes to a plus sign and you get a vertical line that extends to the bottom of the screen.

If you look in the tool bar at the top of the Studio One window,(pointer, range tool, cut tool, eraser tool, etc) on the left of the icons is a left bracket icon [ This enables and disables the multiple use pointer. Once you get used to it, it's very handy, but it definitely takes some getting used to. If you click on the left bracket you will notice that the range tool icon (two dotted intersecting squares) and the pointer arrow are both highlighted to indicate they are active. If you click again on the left bracket, only the pointer will be highlighted and the range tool will not operate unless you specifically select it.

I should point out there is a third function that is enabled in an audio event. It's the gain envelope. If you move the pointer to the very top of an audio event, the pointer changes to a hand with a pointing index finger. When that happens, you can click and drag up or down and raise or lower the gain of a clip. This is prefader and before any of inserts or sends are applied. You'll get an indication when you move the gain up or down as to exactly how much you are raising or lowering gain (in db).

If that's not enough... back up in the toolbar icons, you'll notice a small triangle in the lower right portion of the pointer box. If you click on that, you can change the alternate tool from the range tool to any of the other tools within the toolbar. But you probably didn't want to know that right now.
 
Top